1.0 Introduction
Insights has as powerful layer management system that enables you to create layer groups to organize data for easy access across your projects, teams, and organization.
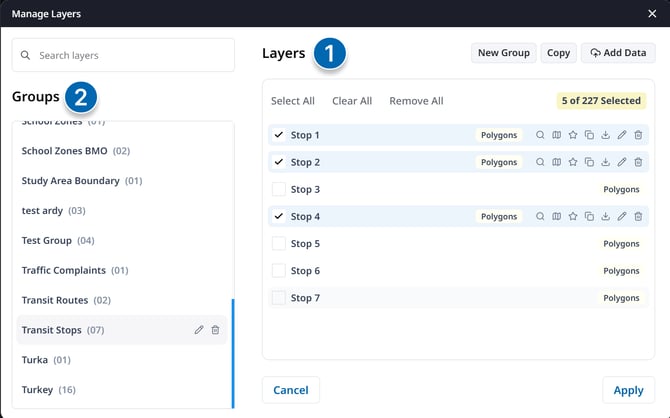
Manage Layers is organized into two primary sections:
- Layers: Individual areas and datasets
- Groups: Can associate many layers to a single group to organize several individual layers together (Example: Organizing 10 individual School Zone areas in a "School Zone" group.)
⚠️NOTE: When you add a single area to the map in Insights, its layer name will match the group it belongs to. To display an area as its own layer with a custom name, create a new group containing only that area and name the group as you want the layer to appear.
Example: If an area called “Zone 1” is saved in the “School Zones” group, the layer added to the map will be titled “School Zones.”
2.0 Layer Management Options
- Open Layer Manager:
- Click the "+" button adjacent to the Layer Dropdown in the top Action Bar; OR
- Click the Layer Dropdown and click "Manage Layers" at the top
- Adding Data:
- Click the "Add Data" button at the top right of the Layer Manager panel
- Choose what kind of data you would like to upload:
- Area: Add a boundary to specify your analysis area
- Layer: Add a dataset to visualize and overlay on the map
- Drop files into the upload dialogue
- (Optional) add uploaded data to a Layer Group
- Creating a Layer Group:
- Within Layer Manager, click the "New Group" button at the top right of the layer management panel
- Give it a name and click "Create"
- Deleting a Layer Group:
- Optional, select one or more layers you want to include in a new group
- Click the "New Group" button at the top right of the layer management panel
- Click "Create"
- Searching for Layers:
- Choose the Group where your layer is saved
- By default, all areas are also copied to the "All" group as well as to the "Polygons" and "Routes" groups accordingly depending on the type of layer.
- If you’re unsure which group an area belongs to, open the “All” group and use the search bar to find it by name.
- Adding Layers from a Group:
- In any group, select one or more layers
- Click the "Copy" button at the top right of the layer management panel
- Select the group you would like to add the selected layers to and click "copy layers".
- Removing Layers from a Group:
- In any group, select one or more layers
- Click the "Delete" button at the bottom right of the layer management panel
- Confirm deletion
- Deleting Layers Completely:
- Layers are only removed from a group when deleted from a group and still reside in the "All" group. If you would like to completely delete the area you must delete it from the "All" group.
- Choose the "All" group and select the layers you want to delete
- Click the "Delete" button at the bottom right of the layer management panel
- Confirm deletion.